Creating Zones of Shared Risks (ZSR)
Rationale
The rationale behind creating zones of shared risk is not only to identify groups of homes having the same vulnerability to a specific flood event but also to subdivide a resiliency program within a town into multiple projects that could be funded and implementented indendently of one another. An example of such aproach is detailed in this paper.
Workflow
The ZSR can be created using create_raw_segments() from the swtbx
library. This function starts by creating random points along 2 contour lines: the one at the base
height of the wall and the one at the maximum flood level that we’re defending against. We use
the contour lines for simplicity and to facilitate the automation of the task. Of course, a more
efficient defense structure may not follow the contour lines but this level of detail should be
dictated by the engineers and not this program. What this tool provide is location of potential projects.
Then, after the random points are created we perform search algorithms within the swtbx to identify potential edges/boundaries for each ZSR. We adjust these edges to the building location (and/or roads) so that the boundaries can’t go through them. And finally, we use contour lines and the boundaries to create ZSR and the seawall/shoreline length for each.
Below is a very simple illustration of the workflow:
The outputs of the Create ZSR tool are saved in a folder named zsr-outputs. All files will be named with town name as prefix. Here are the list of output files:
townname-raw-segments: all floodplain zones in the town split into multiple segments.
townname-final-segments: only coastal segments with capital (buildings) at risk.
townname-coastline: coastline of the final segments.
townname-seawall: seawall of the final segments.
townname-flooded-roads: all flooded roads within the final segments.
townname-road-hints: only flooded roads that can prevent flooding if raised.
townname-road-zsr: zones / segments protected by raised roads.
townname-bridges: all bridges within the final segments.
townname-road-fragments: all flooded roads split into chunks of roads (by default: chucks of 1 meter).
Then, another folder called: scenario-outputs is created by create_default_scenarios().
It contains multiple project folders which are created from each segment in the final segments. Within each project folder,
there are 4 files:
fp-project_id: floodplain of the project.
sw-project_id: seawall solution for the project.
rd-project_id: road-raising solution for the project.
sg-project_id: storm gate solution for the project.
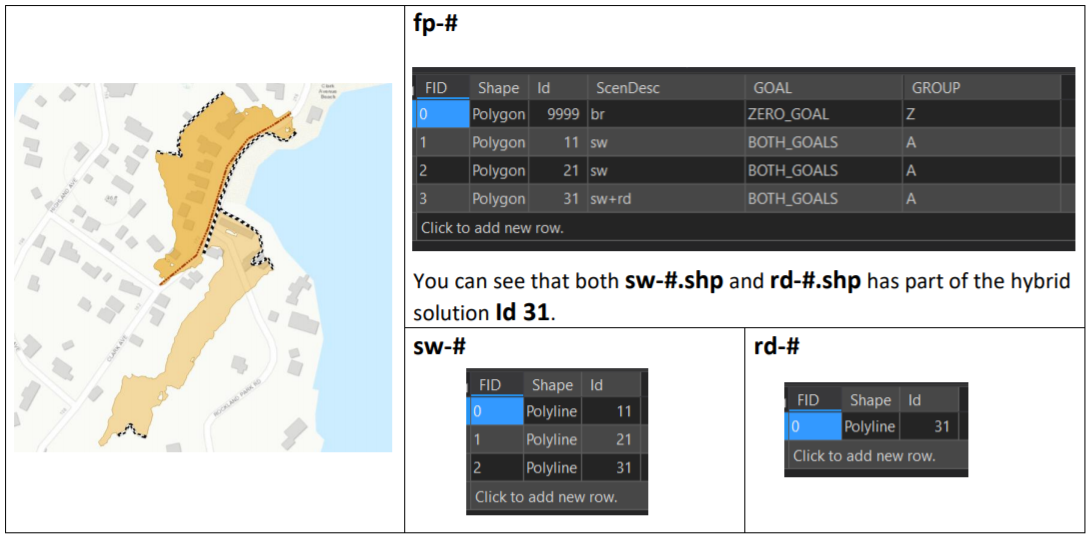
The scenario folders show that for each project / floodplain, we consider 3 types of defense structures: seawall, road-raising, or storm gate.
Adding More Scenarios / Advanced Editing
As mentionned above, it is possible to add more scenarios from the default outputs. Hovewer, it is important to note that this step should only be performed by someone with advanced knowledge of ArcGIS. That is because, adding more scenarios consist of editing the existing shapefiles in the zsr-outputs/scenario-ouputs/project-#:
fp-project_id: Add new row for each new scenario. You can use the editing toolbar to define the extent and location of the zone.
sw-project_id: Add new row for each scenario that has seawall as solution. You can use the editing toolbar to define length and location of seawall.
rd-project_id: Add new row for each scenario that has road-raising as solution. You can use the editing toolbar to define length and location of roads.
sg-project_id: Add new row for each scenario that has storm gate as solution. You can use the editing toolbar to define length and location of storm gates.
Make sure that the new ID added to the fp-project_id matches the corresponding ID of the solution added to sw-project_id, rd-project_id, or sg-project_id. And for hybrid solution, for example, for a solution that combines road and seawall, add the same ID to both.
Here is an example where we edited the default output because there seemed to be more attractive scenarios. Please note that the default scenario was to build seawall around the whole region.